


Stoke Riders
KITE BUGGY RENTAL
KITE BUGGY RENTAL
Couldn't load pickup availability
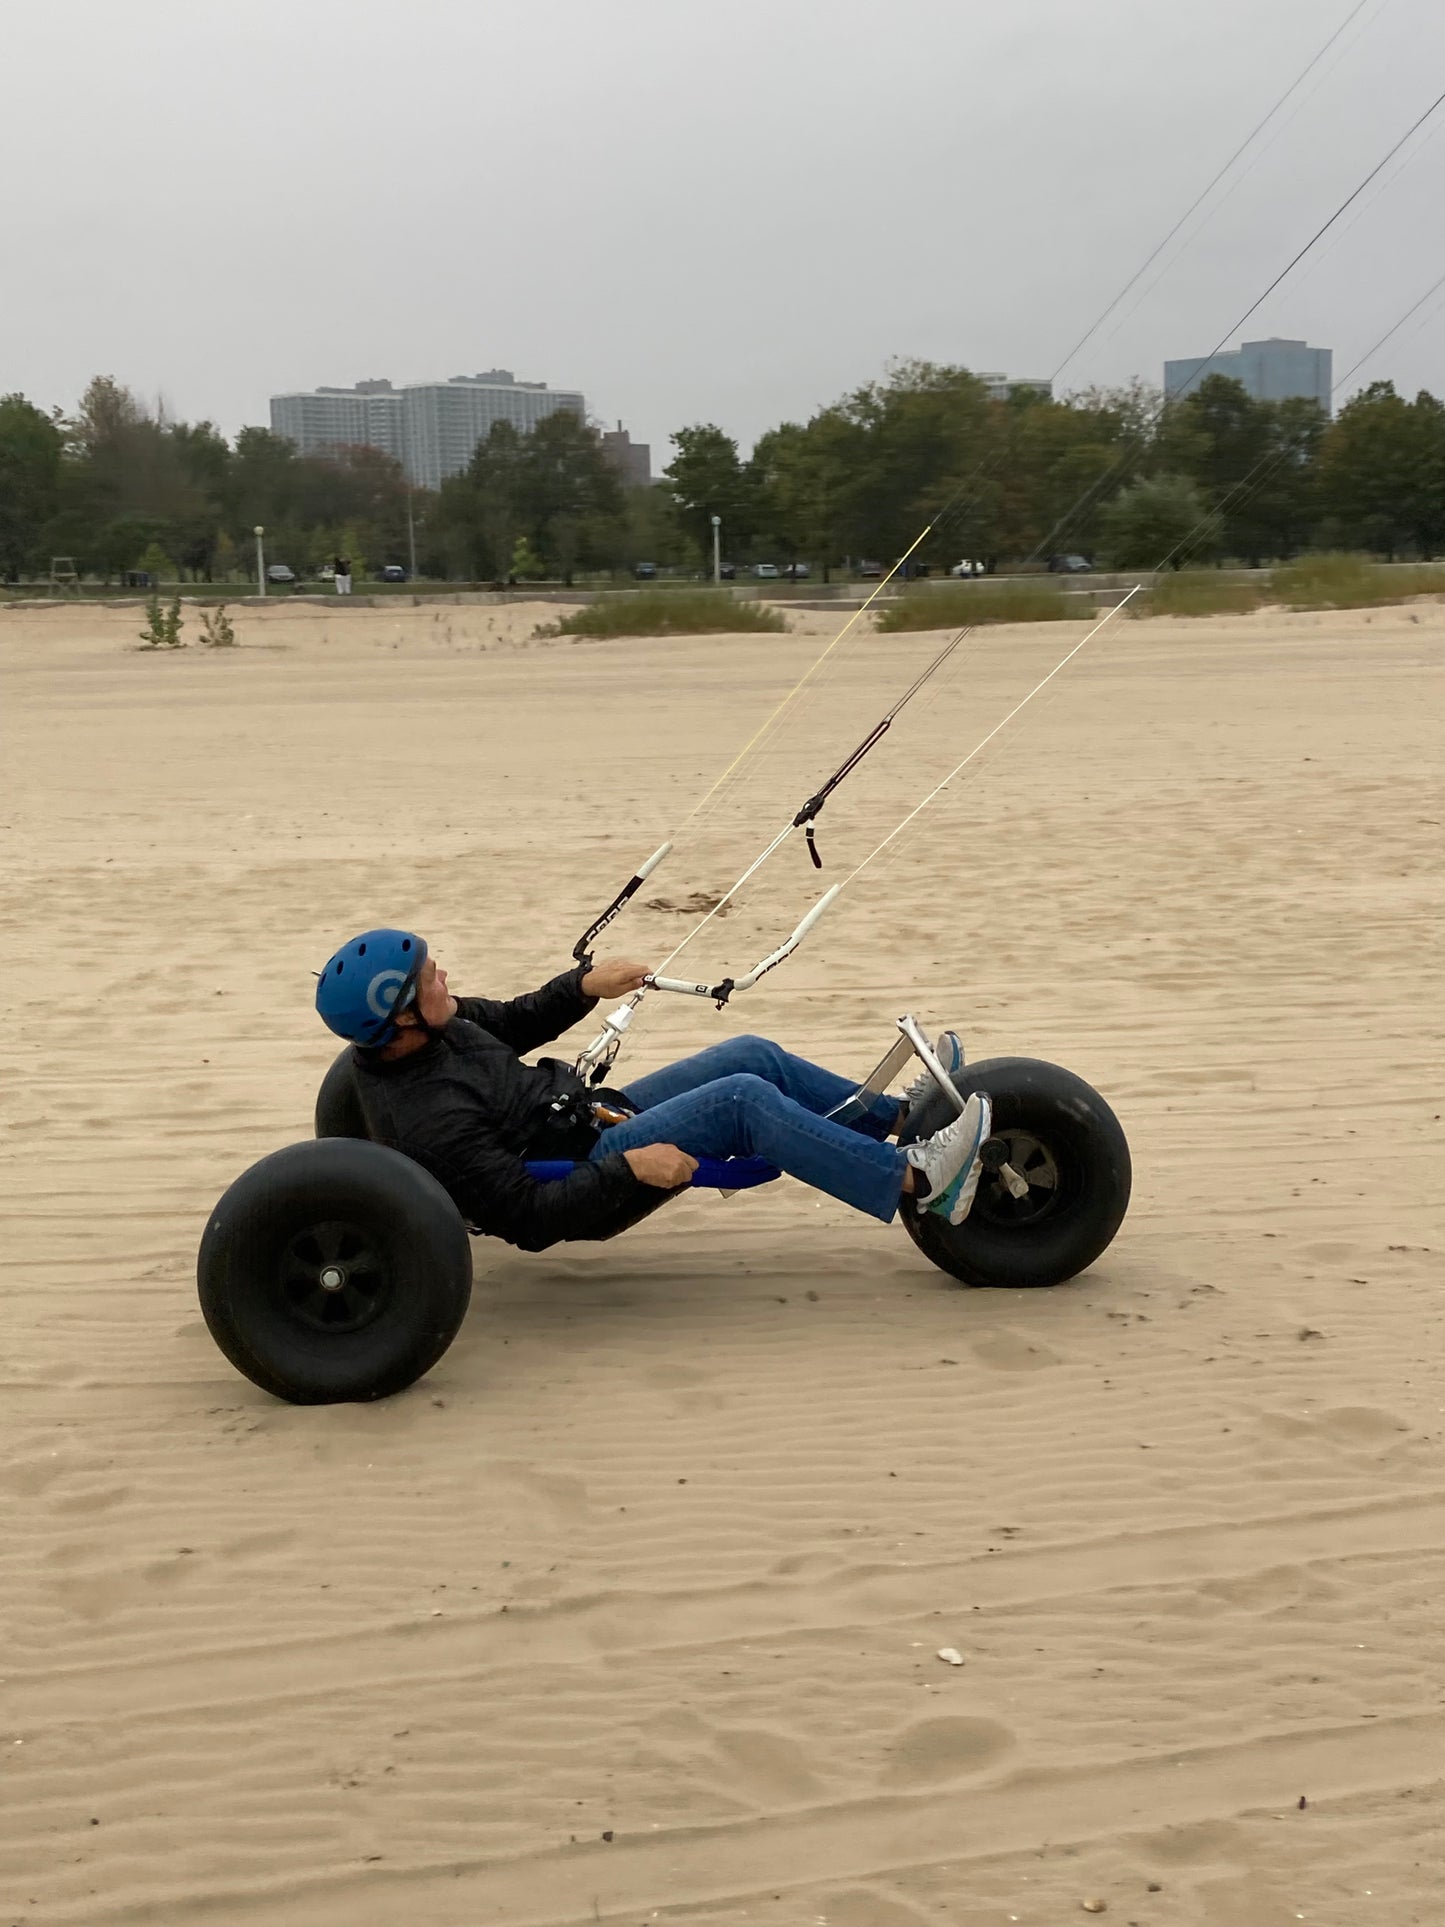
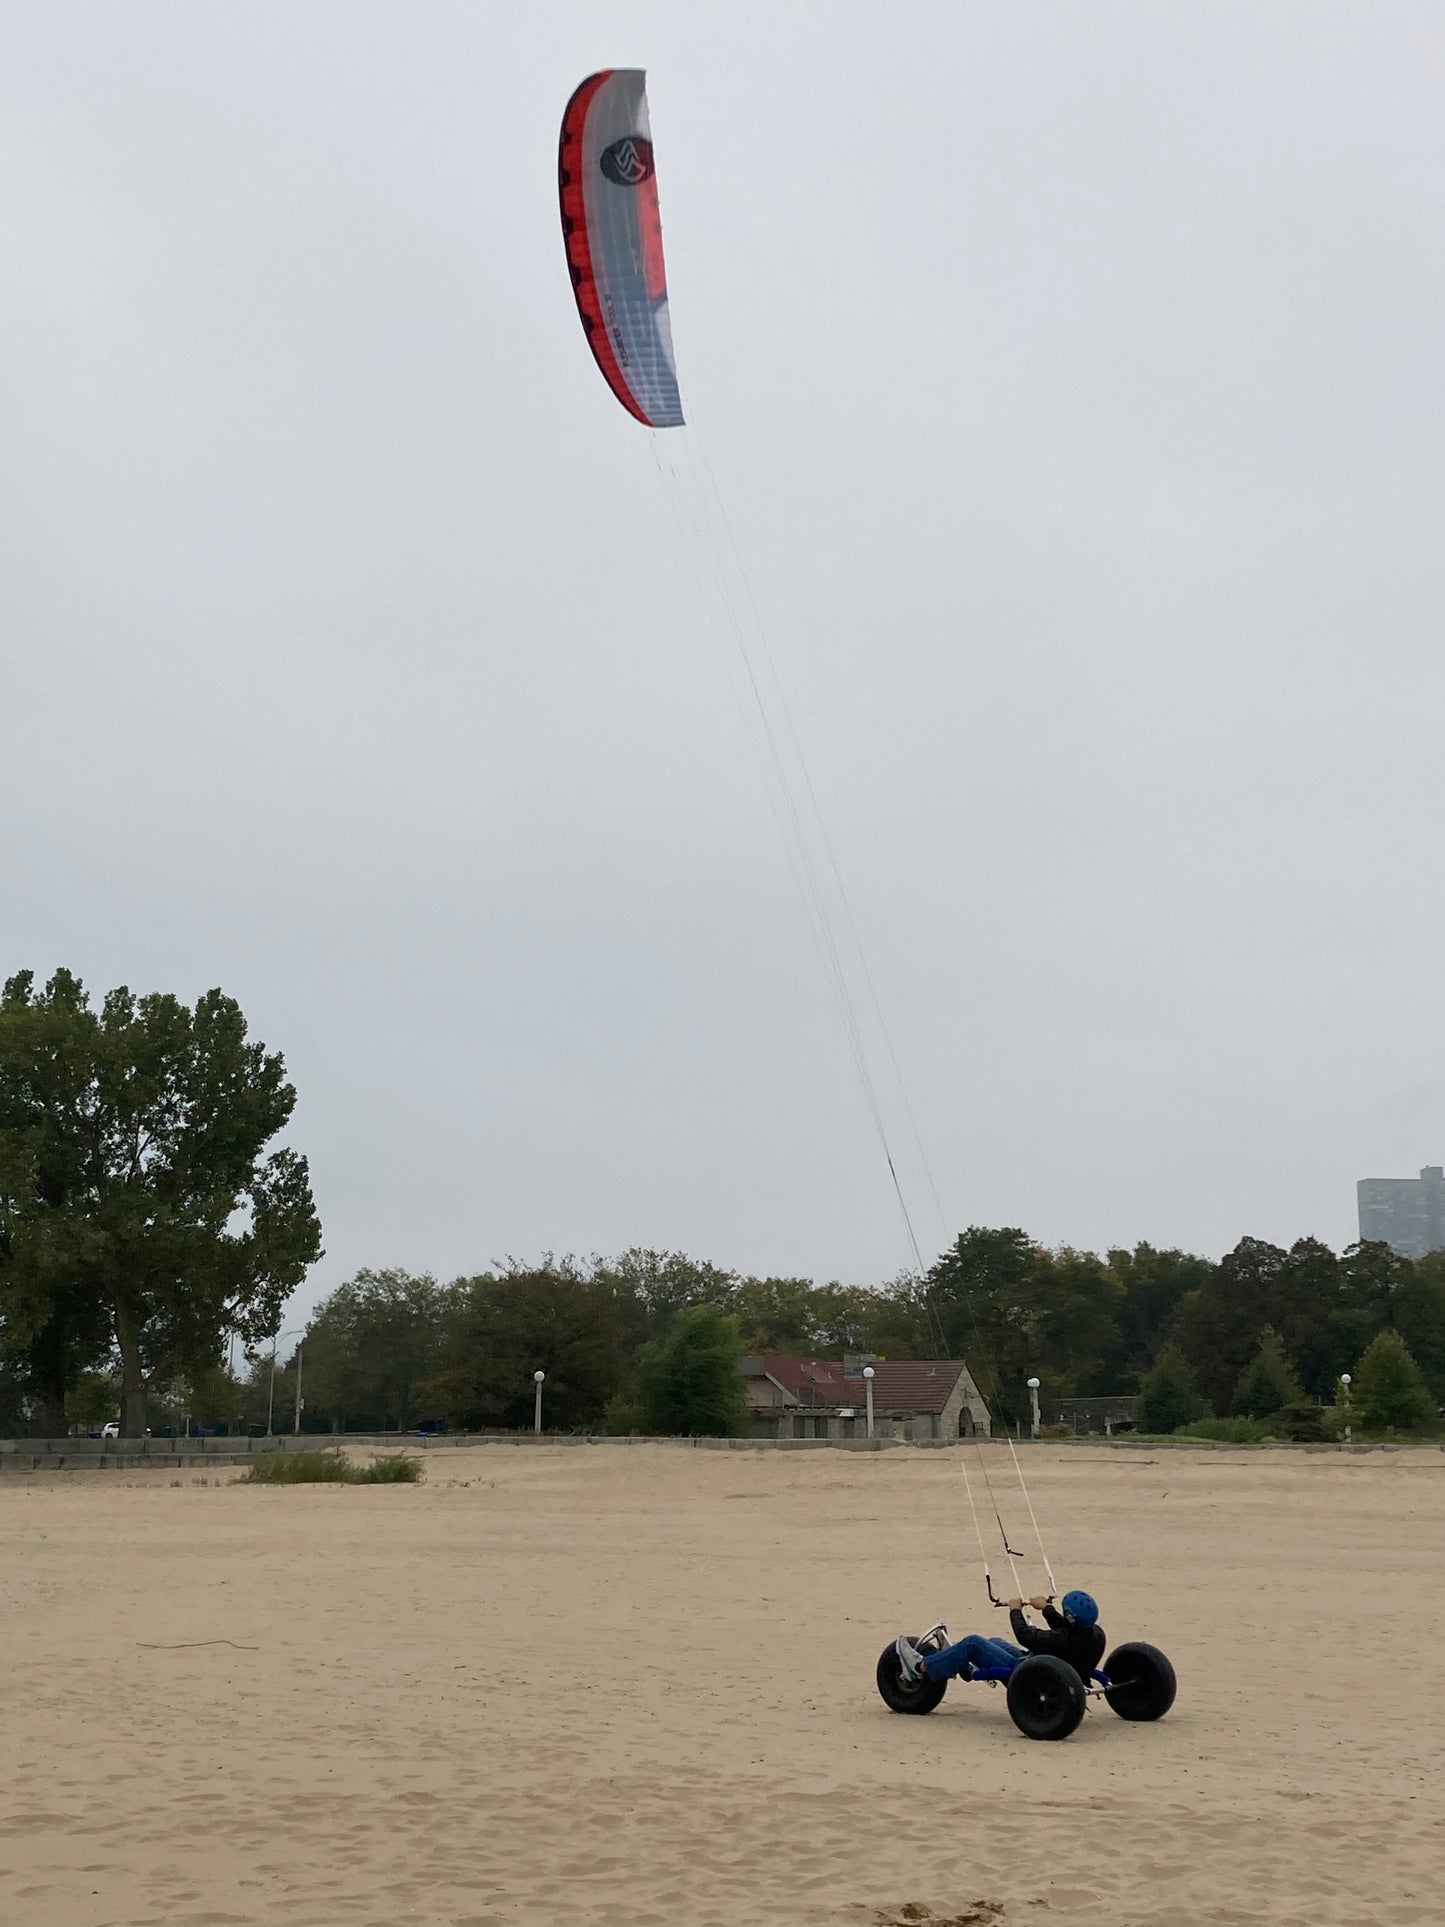
Peter Lynn Bigfoot Sand Tire Kite Buggy
This Bigfoot Kite buggy is impressive on soft sand, allowing you to explore the local dunes and beaches! This opens up your terrain from not only grass and parking lots, but to areas like Silver Lake Sand Dunes and Montrose Beach in Chicago too.
Bigfoot Kite Buggy Features
- Extra large forward wheel base to ensure maximum stability while riding a high speeds.
- Extra wide back axle to minimize sideways flips out of the buggy.
- Double crown front fork for added strength and durability.
- 20 mm rear sealed cartridge style bearings, for an extra smooth ride and durability.
- Specially curved side frames to ensure good side body grip.
Bigfoot Kite Buggy Specifications
-
Frame Material - Stainless Steel
-
Seat - Luxury padded reinforced seat
-
Total Weight
-
64 Pounds
-
29 kg
-
Rear Axel Width
-
47″
-
120 cm
-
Wheel Base
-
54″ – 57″
-
136 – 144 cm
-
Tires
-
21 / 12 - 8″
Want to know what you're getting into???
A Kite Buggy Tutorial, Lets Start at the Beginning
A Kite Buggy Tutorial Courtesy of Angus Campbell, Coastal Wind Sports, Inc.
Copyright 2007-2013 Coastal Wind Sports, Inc.
One of the best ways to put the power of a traction kite to use on land is in a kite buggy or on a land board/ ATB. Buggies, while they cost a bit more and are harder to transport than a board, offer a shorter learning curve because they are so easy to use without the need for balance and boarding skills. Once you know how to fly your kite and understand a little sailing theory, you just sit down and go!

Kite Buggy
A leisurely cruise down Jekyll Island Beach
The first time I sat in a buggy with a kite and started cruising, I knew I was hooked. Nothing beats being able to park your kite off your shoulder and cruise down a beach or across an open field. I love to ghost along the beach here on Jekyll Island with a nice on-shore breeze. When I pass people walking along the surf-line, they cant help but wave and smile with a grin as big as mine.
Getting rolling and learning to kite buggy is actually a pretty easy affair. If you have any sailing experience then you already understand the dynamics. Many people assume that a run in the buggy is downwind only and that you have to walk back to your starting place. Not so! A kite buggy tacks across the wind like a sailboat and can work upwind easily. In fact, downwind runs are awkward in a bug for reasons Ill get into later and its arguably easier to go upwind. Buggies are fast, too. It is easy to attain sustained speeds of over two to three times the speed of the local wind. Faster speeds are attainable with racing rigs and gear, but for now we’ll talk about basic gear accessible to the average novice. So, with a nice breeze of only 12 mph, its easy to hit a cruising speed of about 30 mph in a basic rig, but with your derrière just four inches off the ground, it will seem a lot faster!
A word about safety is in order before we start. Driving a buggy with a traction kite is an extreme sport, and you will be moving fast on hard surfaces. If you have not done so yet, get a good bicycle or moto-cross helmet and consider moto-cross style elbow guards with forearm protection. Buggies have a low center of gravity and are very stable, but it is still possible to flip one and it is almost certain that, as you learn, you will have an out-of-buggy experience or OBE as it is known by buggy drivers.
A Quick Ride in the Bug
To fully understand how to kite buggy, there is some kite work to be done and some sailing theory to understand, but for the impatient readers we will first take a quick ride and cover the basics.
A kite buggy session begins with your kite set up and launched as you would on any normal flying day. It is assumed here that you are familiar with your four line foil and can maneuver it reliably throughout the entire wind window. If not, see Traction Kiting 101.
Pre-position your buggy with the wind coming over one side and the front pointing slightly downwind. Bring the kite to the zenith (overhead) and approach the bug from downwind (always!), straddle the down-tube and sit down. Put your feet on the foot pegs, bring the kite down into the window towards the front of the bug and you will start to move. As you accelerate, turn upwind so that you are moving across the wind, or perpendicular to the direction of the wind, with the breeze coming off your shoulder.
You are now on a beam reach, the easiest point of sail and very fast. As you accelerate, the kite will settle into a spot off your shoulder and slightly forward. To slow down, bring the kite high up towards the zenith. You can slow the kite even more by bringing it high up and letting it drift slightly behind you, but be careful. If you let the kite get too far behind you and it powers up, you will be on your way to your first OBE. This is often spectacular and entertaining for onlookers but not so much for the buggy pilot.
To maintain speed, keep the kite low in the window. To accelerate even more, work the kite by bringing it up to about forty degrees above the horizon and then back down near the ground, scribing a large sine wave through the sky as you go.
Sooner or later you will want to change direction. While a sailboat most often tacks or turns into the wind to change direction, it is easier for a buggy to jibe, or reverse direction with a downwind turn. Start by bringing the kite up towards the zenith and, if you have the room, turn upwind a bit to put the kite just slightly behind you to slow down some. Start the turn by turning the kite downwind in the direction of your planned turn, then follow with the buggy turning as sharply as you feel comfortable. Keep turning the kite with the buggy a moment behind, so that the kite has changed direction 180 degrees and is pulling the buggy out of the turn on your new course, or tack.
When you’re ready to pull in for a pit stop or park the bug, start by bringing the kite up over your head to reduce power and slow down. If you have room, you can turn upwind and put the kite slightly behind you like we did on the turns, but again, take care not to let it get too far behind. When you are slowed down to a walking pace, its safe to put you feet down and stand up. Hop up and get yourself clear of the bug right away to avoid getting dragged across it in a gust and smacking your shins. With a bit of practice you will be able to manoeuvre the buggy back to your starting place every time, unless the wind dies altogether.
Buggy Basics in More Detail
Now, with our appetite wet, lets take a closer look at power kite buggy basics so we better understand the dynamics of the buggy, the wind and the techniques of a practised pilot.
Buggy and Sailing Terminology
See figure 2 for a description of the parts of a typical buggy. Note that the down-tube has several holes where it bolts to the siderails so that the length can be adjusted to accommodate pilots of different heights.

Buggy components identified. This is a Peter Lynn Comp XR + Buggy. The slip joints allow the back axle to come off when the back seat straps are undone in order to fit the bug in the back of a car. Other buggies use bolts here.
Some terminology for kite buggying can be borrowed from sailing since the dynamics are similar enough. Nautical terminology is not used universally in the kite buggy world, but living and buggying here on the Georgia coast in a maritime community, we find it useful and natural. A lot of people who stop us on the beach to ask questions about the sport are sailors or are familiar with boats, so its helpful to use terminology they understand. Its easier and more descriptive for example to say on a beam reach, as opposed to driving with the wind ninety degrees to the buggy. See figure 3 for common points of sail, or directions of travel relative to the wind.

Points of sail illustrated. The beam reach is the easiest point of sail, and the broad reach, up to about 10-20 degrees down from a beam reach, is the fastest. Deeper broad reaches, farther off the wind, are possible with some practice. Running close-hauled, or upwind, is easy but slower.
There are also a couple of useful terms to describe changes in direction relative to the wind. Hardening up or luffing up is turning to a more upwind direction and is easy to remember as you are turning up-wind. Falling off or Bearing off means to turn more downwind and is easy to remember if you think of something being blown over (or off) by the wind.
Port and Starboard, are useful on boats because they describe the side of a vessel that is always the same whether you are facing fore or aft, but in a buggy we are always sitting facing forward (we hope), so left and right work just fine for direction. Tack, in sailing parlance, can be a verb to describe changing direction by turning into the wind, or as a noun to describe a direction of travel. So port and starboard can be useful after all to describe a port tack where you are traveling in a direction that puts the wind coming from the port side (left), or a starboard tack that puts you moving with the wind coming from the right.

Port and starboard tack illustrated. In this case “tack” means direction of travel. They are named for the side from which the wind is blowing. Port for left and starboard for right.
Buggy pilots rarely use tack as a verb because we usually change direction by turning downwind, a maneuver known as a jibe (sometimes spelled gybe). Tacking into the wind is possible, but it momentarily puts the kite behind you which is not a good idea for a beginner. If you lose track of the kite behind you and it powers up, you’ll likely be on your way to a spectacular OBE.
Practice before you buggy
One of the hardest things for a new buggy pilot to get their minds around is the sequence of kite manoeuvres needed for a successful jibe. An excellent way to learn and practice this is to start out on foot, running a figure-eight course with the kite and drilling yourself until the sequence becomes second nature (and you are exhausted).
Start by marking two points on the ground about 12-15 meters (40-50 feet) apart and position them such that a line drawn between them will be perpendicular to the wind. Launch your kite and position yourself between your course markers with your back to the wind and the kite at the zenith.
In this example, start by running to your right with the wind coming off your right shoulder, putting you on a starboard tack. See figure 5. Bring the kite down into the window as low as you can and still be comfortable keeping up with it while it is flying off to your (left) side as you run. Aim for a point a couple of meters upwind of your marker. As you near the marker, start bringing the kite up towards the zenith, timing it so that as you are abeam of the marker (it is right at your side), the kite is directly overhead. As you pass the marker, start turning the kite to the left, downwind. The proper direction of turn for the kite is easy to remember if you just know to start pulling with the arm that is on the inside of the turn, in the direction you want to go.

Sequence of practice jibe on foot. Start turning the kite first, then follow. The kite should finish the turn slightly ahead of you and pull you out of the turn on the opposite tack.
As you round your marker, the kite should be just about a quarter-turn ahead of you, so that when you are facing downwind, the kite should be almost finished with its turn. As you finish the first half of your turn, you should start bringing the kite down from the zenith. As the kite dips down, it will power up again, requiring you to quicken your pace as you are pulled out of the turn in the opposite direction on what is now a port tack.
Now head to the other marker the same way, just up wind of it so that you are scribing a figure-eight on the ground. Going as slow as you are on foot, you may not be able to bring the kite far down into the window and still keep up, but that is OK. Even if the altitude of the kite changes by just a few degrees up and down as you complete the course, the sequence, timing and resulting forces will be instructive.
Starting Out: The right Wind for the Kite
For the first few times out in the buggy with the kite, its best to be a little bit under-powered, with a smaller kite in a moderate breeze. For example, with typical a 3-4 meter starter kite, a steady 8-10 mph wind is perfect. You will move smartly if you work the kite, but wont have to deal with bursts of speed while getting comfortable and training your reflexes. Additionally, your jibes will be smoother since it will be easier to keep your lines tight in a turn. If the importance of this last point is not clear to you now, it will be after your first session.
If you start with a larger kite and try to compensate by waiting for a lighter breeze, it will work, but will be more difficult to learn. When you turn downwind, you will be chasing your kite for a moment, and in a light breeze with a bigger kite, this can lead to trouble if you do not time the turn of the kite and the buggy just right. If you get it wrong, you will out-run your kite in the downwind turn, the lines will go slack, then the kite may luff and bow-tie (deflate, fall and get a line wrapped around it). At best in such a situation you can re-position the buggy, shake out the kite, and re-launch. At worst, you run over your own kite lines and risk wrapping them around a wheel and axle.
Wind direction is important too. If youre in a field, the ideal wind direction will be at a right angle to the longest axis of the field. Same thing on the beach; the perfect wind is at a right angle to the beach, directly off the water. An off-shore breeze can work, but the winds tend to be more lumpy. Ask the locals about prevailing conditions for the seasons and times of day. If there are no other buggy people, ask any kite boarders or local sailors. On Jekyll Island, we know that in the hot summer days, no matter what the forecast is, when the afternoon sun heats the island it will draw an on-shore breeze. Meteorologists call it the “sea-breeze effect”. We also know that its usually stronger when the tide is just starting to flow back in from low tide.
Preflight check
Before launching your kite, make sure both you and your buggy are ready to go. When you launch, you will literally have your hands full, and it is not the best time to realize you forgot to put on your helmet, hook up the splash guard, or complete some other task.
Check your axle bolts to make sure they are tight. The forces acting on them can easily loosen them and result in wheel rim and bolt damage. This is especially true of the rear left wheel, since the wheel rotation is counter-clockwise in the same direction as you would turn to loosen the bolt.
Also make sure the buggy is positioned upwind of you. Never approach the buggy from the upwind side with a kite in your hands. If a gust comes along and powers up the kite, you risk being dragged into and over the buggy and that hurts! Lastly, make sure its pointed in the direction you want to start off in and slightly downwind, about 40 degrees, more or less.
First Run in the Bug
With the kite parked overhead at the zenith, approach the bug from the downwind side, straddle the down-tube and sit down right away. Anytime you are standing in the buggy, you are vulnerable to knocking a shin or ankle if a gust comes along. Look around for people in your intended direction of travel and wait for them to walk clear if need be. When you are ready, put your feet on the pegs and start dipping the kite down from the window towards the front of the buggy and you will start to move. As soon as you are rolling, harden up by turning upwind so that you are traveling 90 degrees to the wind.
At this point, its really easy to get going really fast, really quickly. Thats all fine and a lot of fun until you run out of room and realize you don’t know how to stop. Avoid this by executing a jibe before the buggy gets going beyond a swift jogging pace. In fact, one of the best ways to learn to navigate the buggy comfortably is to stay on a small closed course, like you did on your feet to practice, but of course just a bit wider. Limit the course length to one kite dip. In other words, as you come out of one jibe, dip the kite once to power up and start gaining speed, then right away bring the kite up and begin setting yourself up for the next jibe back again. If you practice this, and gradually lengthen your course as you feel more comfortable and in control, you will be less likely to have an Oh sh#t! moment. Now lets look more closely at that first jibe in the bug.
Jibe Talking
The steps for the proper jibe are just like the ones we used for practice on our feet, but of course it will happen a bit faster in the bug. If you have chosen your winds right for the first time out and you don’t let yourself get going too fast, it will be easy, even if you don’t time everything just right.
To start, slowly bring the kite up to the zenith to halt your acceleration. Never swoop your kite to the zenith too quickly, or it might develop lift, in which case you’ll be off to an OBE and a bird’s eye view of your buggy. If the wind is light and the kite will not climb, harden up a bit (turn upwind). That will increase line tension, increase the speed of the kite and let it climb while also slowing you down a bit. To start your jibe, begin turning the kite downwind in the direction of your turn. A moment later, start turning the bug in as sharp a turn as you feel comfortable with. If you never let yourself get going too fast, you should be able to turn inside of a 30 foot square box. As the bug is facing downwind, dip the kite down from the zenith as you follow it and let it power up as it finishes the turn, pulling you out on the opposite tack.
As the buggy accelerates, start bringing the kite up for the next jibe. Keep drilling this way and experiment with the timing so that the whole maneuver is smooth, fluent and second nature. As you become more comfortable, lengthen your course and let yourself go a little faster before your next turn.
Common Mistakes for the First-timer
Thinking about the problems I had when learning to buggy by myself, and watching other first-timers consistently make pretty much the same mistakes, it’s easy to sum them up in a short list. If we know what they are ahead of time and give them some thought to understand why they happen, then they are easier to avoid. Here are the top three, in the order in which they commonly occur…
1. Going too fast too soon: With the exception of high speed skidding turns, which we don’t need yet, all the dynamics of kite and buggy work just as well at 5 mph as they do at 25 mph. There is no need for speed while we teach our muscles the reflexes we need. The buggy will always accelerate faster than you think, so you only need to tease the kite from the zenith down into the window in little bits just to get going. Often, I have seen first-timers plow the kite into the window and go ripping off towards their first brown-trouser moment where they immediately forget everything they have read here or have been told. I could scream “Turn NOW!” into their ear and they will not hear anything. Keep your speed to a jogging pace and you will have time to sort things out. You can even make the bad mistake of putting your feet down to stop and probably not hurt yourself.
2. Forgetting where the wind is coming from: Because of mistake number one above, the newbie takes off driving at an impossible tacking angle, completely oblivious to the wind and then wonder why the kite crashes. Sometimes everything starts out well, but after the first turn the student gets disoriented and puts the kite at an awkward angle to the wind. It’s easy to read this article and understand what a beam reach is and the need to keep the wind off your shoulder, but it’s a lot harder if things are happening too fast. A lot of it is not the student’s fault; the apparent wind that the driver feels in the face is not the same as the true wind they feel when standing still, and we will cover this topic in a minute. It’s important to take stock of your surroundings ahead of time and decide not only the direction you will take off in, but also the direction you will take to return. Look around and pick out some landmarks to steer for. On the beach, it’s easy to steer for the surf line, but when you turn around, where are you going to point?
3. Chasing the kite: Like a moth drawn to a flame, the novice buggy driver often tends to want to turn towards the kite and this never ends well. It usually happens after the first jibe attempt where the full 180 degree turn is never completed, a result of items number 1 and 2 above. At best, the lines go slack and the kite falls to the ground. At worst, the buggy runs over the lines and they get wrapped around the axles(s). I’ve seen cases where we’ve had to disassemble the buggy to save the lines, and other cases where the line set was completely destroyed. This is why it is better to start out with a brisk breeze and a small kite, a combination that is much more forgiving since it’s easier to keep the lines tight, even in a broad gentle turn. Again, if you keep your speed down, it’s so much easier to make a tight, full 180 degree jibe without fear of losing control and tipping over.
Again, as common as these mistakes are, they are pretty easy to get past if we know about them ahead of time. The key is to keep our speed down until we can sort things out. The first time the jibe goes right and the driver feels the kite pull them out of the turn smartly on an opposite tack, they get that big “Ah ha!” moment and the problem goes away forever. The next big epiphany comes the first time the back wheels break loose in a skid and the driver sees at once how easy and useful it is. After these milestones are behind you, it’s off to buggy heaven.
Sooner or later, you will miss-time a turn or miss-judge the wind and luff the kite, causing it to fold up and fall with the lines slackening in a giant arc towards the ground. If you can keep from running over the lines, you have a good chance at a full recovery. The kite will drift downwind as it falls, the lines will start to tighten, and there is a pretty good chance the kite will unfold, un-tangle and re-inflate. The problem is, it may not be pointed in the direction you expect or want, and when it re-inflates, in can power up suddenly and with great force (after all, its now down right in the center of the power zone). If you get things really mixed up and the kite is behind you when it powers up, things become dramatic quickly. You may end up with a seat ejection that would make James Bond envious. For this reason, the best thing to do if you lose track of the kite behind you or you feel it powering up in a direction you did not expect, let go of the kite handles and let the kite killers do their job (you do have kite killers, right?). This may sound obvious, but a lot of new flyers will maintain a white-knuckled death grip on the handles when things go south and forget that they can just let go.
Slowing Down and Stopping
As you lengthen your course run between turns, youll continue to be surprised at how easy it is to accelerate and will start wishing you had more control. You actually do have brakes; you just have not discovered them yet. First and most important: your feet are not your brakes!! Never take your feet off the pegs until you are slowed to a walking pace or slower and can stand up safely without vaulting out of the buggy.
To control your speed, you can slow down first by hardening up, and this also helps bring the kite up to the zenith quickly for your next jibe. If you are going faster and want to stop, gradually keep turning upwind and feel the lines tension increase as they pull from behind. Just don’t let the kite get too far back behind you or you could be on your way to an OBE in a gust.
Another way to burn off speed is to do a quick S turn by kicking the front wheel over hard one way and back the other way. At slow speeds this will stop you and at higher speed, it can scrub off speed to slow you. Experiment first at slower speeds with full lock-to-lock throws of the wheel, and then as you go faster, with smaller twitches of the wheel. You will likely feel the back tires break loose and skid a bit and that really burns off the speed. But be careful and practice with gradually increasing throws of the wheel, until you can predict how your wheels and the surface will interact.
Even if you do a good job staying clear of people and pets when you buggy, there will be time when you will want to be able to stop in a hurry. Toddlers and puppies are the ones that concern me the most when Im cruising on the beach. They see the kite, get excited and start running toward you! On hard pack sand and smooth turf, the buggy can be stopped quickly by throwing it into a skidding turn. It is easier, really, than it looks.
If you have been experimenting with your jibes and letting yourself go gradually faster, you have probably felt the back wheels break loose and skid a bit, especially if you have tried the S turns. It does not take much. To panic stop, kick the wheel hard over down wind and keep your center of gravity low by leaning forward and into the turn, hooking your inside elbow down around the downwind side rail. This effectively will throw your hips to the outside of the turn. The bug will slide sideways and, on your first attempt, very likely do close to a 180 degree turn. With some practice, you will learn to adjust your steering throughout the turn to either slide sideways to a stop, keep spinning to complete a 180 turn, or even exit the skid and continue in the original direction with much or all of your speed scrubbed off.
In addition to being used as a panic stop, the sideways slide is a good way to execute a jibe when you are moving at a good clip. On some surfaces, you may notice your front wheel sliding sideways rather than “digging in” and bringing the front of the buggy around. You can hasten the rate of turn by leaning forward to put more weight on the front wheel so that it slides less and turns more. By shifting your weight around, you can learn to move from a sideways slide to a deliberate turn, or any combination, depending on the desired effect. I’ll start a jibe from high speed by throwing the bug into a side slide to scrub off speed, then as the kite finishes the turn, I’ll lean forward so the front wheel digs in and brings the front of the bug around to follow it. If you have trouble with the front wheel skidding in any event, consider shortening your down-tube to put more weight on it in the first place. You can also let some air out of the front tire to increase its footprint.
As easy as this is, its just as easy to flip the buggy in a most spectacular fashion if you are not careful and don’t see an obstacle . Objects like rocks in a field or washed out sand castles on a beach can catch a wheel rim and throw you if you hit them sideways just so. One season we had the unusual phenomenon of hundreds of jellyfish washing up on the beach, being left to dry out as the tide receded. As they dried in the sun they became hard as rocks and difficult to see since they remained translucent. I flipped the bug twice on the unfortunate little buggars when I caught a wheel rim on one in a skidding turn.
When I go out on the beach for a buggy session, I always make the first run at moderate speed so that I can survey the surface and make a mental note of holes, tide pools, gullies and the like. Every new low tide leaves a different beach surface. More than once I have gone barreling into what I thought was a one-inch deep puddle, only to find out it was eight inches or more of standing water. Once again, spectacular for the on-lookers but a bit of a surprise for me.
The Importance of Apparent Wind
Now that you are getting ready to take off on long runs and build up speed, lets stop and discuss some of the dynamics of sailing the buggy and discuss what happens when you put yourself, the kite and the buggy into motion.
When you fly statically (on your feet), the wind window is always downwind of you with the wind blowing at your back. While you can bring your kite to the edge of the window, you can never quite get it all the way to a point at 90 degrees to the direction of the wind, or immediately off your shoulder. This is due to the aerodynamic drag on the kite. A more efficient race kite may get closer to dead into the wind, but generally the kite will get within 15 degrees before it stops advancing. So we have a window that is an arc about 150 degrees wide (180 degrees, minus 15 degrees on each side) with a radius the length of our kite lines and centered dead down wind of where we are standing.
When standing still, the window does not move unless the wind shifts direction. All that changes however, when you set things into motion, and the effect is called apparent wind. To understand apparent wind, think of yourself standing outside in a dead calm with no wind. Now imagine hopping on a bicycle and moving at 10 mph. The breeze you feel on your face is coming at you at a speed of 10 mph and that is the apparent wind. If you stand still with your bike and there is a 10 mph breeze blowing outside, the local wind and the apparent wind are both 10 mph because you are motionless. Ride your bike directly into the wind at 10 mph and the local wind is still 10 mph, but your feel the apparent wind on your face blowing at 20 mph since you have added your motion to the picture.
The effect of moving across the wind, say at 90 degrees to the breeze starting with the wind right off your shoulder adds another dimension and makes things more complicated, but it is easy enough to figure out with a simple diagram. Take a look at figure 6. Start by drawing a line A in the direction of the wind and use a unit of measure such as an inch or centimeter for each 1 mph of wind speed. To keep things simple we used 10 mph. Now draw line B from the same starting point to show your direction and speed of travel at 90 degrees to the wind, also at 10 mph. These lines are known as vectors, since they indicate direction and force, or in this case, speed. If you connect the free ends of A and B with a line to form a triangle, you get a vector C showing the direction and speed of the apparent wind you feel on your face. It shows the wind coming off your right side at an angle of 45 degrees and if you measure or calculate the length of the line, you get just over 14 mph.

Vector diagram to determine apparent wind direction and speed. Start with line “A” indicating true wind direction and speed. Then add line “B” with buggy direction and speed. Connecting the free ends with line “C” yields apparent wind direction and speed.
We can calculate the value for the apparent wind without a diagram by reaching back to high school math and dusting off Pythagorean Theorem. Remember that it can be used to find the length of the hypotenuse (our apparent wind vector) of a right triangle by adding the squares of the length of the two shorter sides and calculating the square root of the sum.
A2 + B2 = C2, where C is the hypotenuse
OK, so this calculation is a nostalgic factoid, but it will be of limited use in the real world, and will will see why in a minute (if you haven’t figured it out yet).
Why is apparent wind important? Well, follow this chain of thought and you?ll see the important effect it has on the buggy in motion.
* We know that we like to have the kite downwind and somewhere out if front of us in order to pull the buggy forward.
* We now know that as we move forward, the apparent wind moves from the side, to where it is coming from more in front of us.
* We know that the wind window is always dead down wind of the apparent wind.
* This means that as we accelerate and the apparent wind moves forward, the wind window starts to move to more behind us.
It should follow then that at some point as we continue to accelerate, the edge of the wind window, the point past which the kite cannot fly, will be almost directly to our side rather than anywhere in front of us and we will reach our theoretical maximum speed.
Lets look at figure 7 to see how this plays out. In figure 7a, the buggy is parked pointed slightly downwind and ready to go. The local true wind is 10 mph from our right. The apparent wind is the same when we are motionless, and so the wind window is right downwind of the bug’s left side. The buggy will take off following the line with the arrow, first moving a bit downwind as it starts to roll, then hardens up, turning into the wind until it is traveling at 90 degrees to the local true wind.
In figure 7b, the buggy has accelerated to 10 mph. As we saw in figure 6, the apparent wind has moved forward to 45 degrees off our right and has increased to 14+ mph. The kite is flying in a wind 40% faster than the buggy and starts to pull much harder on the pilot. The edge of the wind window has swung back but is still far enough ahead of dead abeam so that there is plenty of forward pull from the kite. The buggy is still accelerating.
In figure 7c, the buggy has accelerated to over twice the speed of the local wind and the kite is howling along in an apparent wind of 24 mph. With the apparent wind so far ahead, the edge of the window is just a few degrees ahead of dead abeam. At this point the sideways pull is considerable and the bug is likely going to start slipping sideways. Somewhere around 23-25 mph of buggy speed, we will be near maxed-out and the kite will be pulling from the side with no forward pull left. We are still using the assumption that the kite is 15 degrees behind dead into the apparent wind, but more efficient kites can do better. So now it seems we are just about at our theoretical maximum speed for a beam reach. But in fact we have one more trick.

With the buggy stationary, the true wind and apparent wind are the same at 10 mph from the right.

With the buggy moving at 10 mph, the true wind has shifted forward and is now coming from the right at 45 degrees in front of us. The kite is flying in 14+ mph of apparent wind.

The buggy is moving at about 22 mph and the apparent wind has shifted far forward, Putting the edge of the window and the kite closer to dead abeam. The kite is flying in about 24+ mph of apparent wind and pulling to the side pretty hard. Somewhere around 25 mph of buggy speed, the kite will be all nearly all the way to the side with little remaining forward pull.
Note: Maths whizzes may take me to task on my theoretical limits as described in these vector diagrams, and Ill admit that my numbers are pretty squishy. As the angle of the hypotenuse at the base of the triangle grows, the speed vector lengthens quickly, indicating some pretty fast theoretically possible speeds. In the real world though, there are many forces acting on the kite and buggy that limit our speed. Mechanical and surface friction, wheel traction, aerodynamic drag and other forces affect us one way or another. These diagrams are meant to illustrate the general relationships of wind, speed and direction. However, empirical observations suggest that two and a half to three times local wind speed is a good figure for recreational buggy pilots and four times is possible with full blown racing kits (and big kahoonas).
This is also a good place to note that these diagrams and the Pythagorean Theorem work only when we have right triangles and are travelling at a perfect 90 degrees to the true wind all the time. Well, that’s not going to happen at any flying spot I know of, so while the vector theory holds true in the real world, the maths to calculate it gets more complicated, but at least we have illustrated our point about apparent wind. So for now, let’s just chuck the maths and get flying!
Getting More from the Kite and Wind
We know that the faster the kite goes, the more pulling force it generates. We now have seen that we can get the kite ripping along at about 24 mph apparent wind in only 10 mph of true wind and it appears as if we can expect no more from it. If, however we can make the kite fly a farther distance in the same amount of time, it stands to reason that its airspeed must increase, and we can do this by working the kite. To work the kite, fly it up and down in the window from about 40 degrees altitude down to about a few feet off the ground and then back up again as you barrel along. See figure 8. The buggy is going in a straight line but the kite is carving a giant sine wave in the air and covering more distance, with the resulting added speed creating more power. The pilot feels no more wind when working the kite, but the kite is subject to increased apparent wind.

Working the kite in a flight path shaped like a sine wave forces the kite to fly faster, generating more power.
By working the kite for more airspeed and pull we can probably get closer to 30 mph in this scenario. About that time is when the wheels will likely start slipping sideways. Depending on your surface, you can maybe get a bit more speed before you slip by experimenting with different air pressures in your tires. Lower pressure will flatten and broaden its foot print for more grip, but go too low and you increase rolling resistance and possibly wear on the tire.
The other way to get more speed is to get a more efficient kite, as mentioned earlier. Higher performance kites, usually with a much higher aspect ratio and low-drag profiles will get a lot closer to the edge of the window than the fifteen degrees we used in our example with a basic rig and basic skills. High performance and race kites can be a handful and are trickier (slower) to turn, but with this they bring speed. Look at our vector diagram again and consider what would happen if we changed our angle to the edge of the window from fifteen to about five to ten degrees. The angle at the base of the triangle gets larger, the hypotenuse quickly gets longer, and this means that our speed vector gets longer with it. As the kite gets closer to the theoretical edge of the window, every degree has a greater and greater effect on maximum speed. With the right buggy, kite and pilot skills, speeds of four times the local true wind are not out of the question. With large light light-wind kites, it’s possible to launch a kite in a momentary puff, get it moving in the bug, and later come to a stop and realize that there is practically no wind at all; the kite was “making its own wind”.
If the thought of such light-wind flying is alluring, well it is. However such large and efficient kites are best left until you have milked everything out of what you have and have honed your skills. Light-wind flying takes a lot of finesse and, believe it or not, a lot of strentgh. Remember also that the larger the kite, the smaller the practical usable wind range. For this reason, we will wait and talk more about light-wind flying in the next article in the series.
Working Downwind
It seems intuitive to the newcomer that going down wind should be easy, but in fact it is one of the trickier points of sail. Unless you maintain the proper tacking angles you can easily outrun the kite, cause it to drop from the sky, whereby you risk running over your own lines. On the other hand, a slight downwind tack (called a broad reach), can be the fastest point of sail and you can travel downwind faster than the (true) wind itself!
To experience this effect, start with a beam reach (90 degrees to the true wind) and then turn slightly down wind, about 15 degrees. If you work out a vector diagram with the wind coming from slightly behind you, you will see that the apparent wind velocity will drop a bit and we know that this should reduce power. On the other hand, with the apparent wind swinging behind you, the wind window swings forward, suddenly putting the kite deeper into the power zone and giving you a burst of power that outweighs the loss of apparent wind velocity. Keep turning farther down wind, and somewhere around 100 to 110 degrees from the true wind (or 20 to 30 degrees down from a beam reach), the drop in apparent wind outweighs any other benefit. The buggy initially accelerates, but that causes the apparent wind to swing back forward, the window to swing back behind, and a balance is again reached, after which the buggy velocity begins to drop.
As the buggy accelerates on a broad reach, you can gradually turn farther down wind until you are about 120 to 140 degrees off the true wind and still keep the kite in the air, parked off your shoulder. On such a tack, you will reach a point where, if you turn even one degree too far down, the kite will luff and start to deflate, falling to the side and behind you. Your best indicator will be your line tension; when they start to slack, you know you have pushed it too far and you will have to harden up to keep the kite in the air. I find this easier with a kite on handles as opposed to a bar, as I have more control and brake input for those tight light air turns.
Once everything is balanced, a deep broad reach is a delightful point of sail. The buggy is going at a good clip, there is only a gentle, almost spooky breeze of apparent wind, and the kite handles are feather light in your hands with the kite floating along low in the window and just out in front. Every crackle of a twig or seashell under your tires is especially loud and every bump is felt in the bones, and yet you ghost along and can sneak past pedestrians without them hearing you approach.
Our broad reach of 120 to 140 degrees off the wind is about as deep as we can go “park and ride” style, but if you have a fast kite, you can sometimes go even farther off the wind by working the kite to keep it moving in its own wind by essentially doing figure eights to your side. What seems counterintuitive about this at first is that this means flying the kite in the opposite direction of your travel for a moment. What you are doing here is keeping the kite moving and setting it up high and to your side and even slightly behind you so that you can turn it around for a forward diving power stroke, then bring it up, take it back and repeat. This is easier in higher winds with a smaller kite than the other way around. In 20 mph winds with my Rage 3.5 (a fast kite and great buggy engine), I have gone as far as about 160 degrees off the true wind (or 30 degrees up from straight down wind) and still managed to hold a course and keep the kite flying. Leave yourself room to harden up in a hurry, though. I’ve let myself get boxed in by the surf line and a luffed kite and actually found myself downwind of the kite with it floating towards me on slack lines, and that’s never a pretty ending to a good run.
All good things must come to an end, and there comes a time where you will have to turn upwind and head back to buggy camp. On a downwind run, turning farther downwind to jibe will just drop the kite from the sky and cause you to run over your own kite lines. The way to avoid this is to harden up and put tension back into the lines so the kite rises to the top of the window. With the kite high up, you can turn the kite back and quickly jibe right underneath it and, before it luffs, be on your opposite tack. This is never a problem when you are on an open space like a dry lake, but on a narrow field or beach you always have to leave room for this manoeuvre.
Take a look at figure 9 to see the whole course of our down wind run. It is a typical day when the wind is light and not a perfect ninety degrees to our run, so we have an upwind slog in one direction and a broad-reach run in the other. Starting at point A we are bearing across or only slightly down wind while we initially accelerate. Turning too far down wind too soon will only cause us to slack the lines and drop the kite. As we build up speed at point B the apparent wind swings forward so we can start bearing off the wind and maintain the same apparent wind speed and angle. At point C we get a puff of more wind and can bear off even more for a moment and buy us more room on the beach. At point D there is a momentary lull and the kite begins to fall on slack lines. We have no choice but to harden up again and lose some room we gained in order to keep the lines tight and the kite in the air. As we go deeper down wind, we can do figure-eights to our side to keep the kite moving and the lines tight. At point E we are running out of room and will be in the surf soon. If we try and jibe now, we will drop the kite for sure, so while we still have just enough room, we harden up and put enough tension on the lines to be able to steer the kite up near the zenith and execute a jibe. We then come out on the opposite tack and either begin our trip back upwind (point F), or tack across the beach to set up for another downwind leg (point G).

A downwind run on narrow beach. After accelerating from point “A”, you can fall off more downwind without dropping the kite,”B”. In a puff you can fall off more, “C”. In a lull you will have to harden up to keep the lines tight, “D”. When you are nearly out of room, harden up sharply to lift the kite for a jibe, “E”. Then set yourself up for an upwind beat, “F”, or continue on another downwind tack,”G”.
In moderate to high winds, its easier to keep the lines tight and the kite in the air, but the effects described above still exist. Even then, you can never go dead down wind for more than a moment, so the same rules apply to the same manoeuvres, but just at higher speeds.
Working Upwind
Working your way upwind is pretty easy in the buggy. In fact in light wind you may sometimes find its the easiest tack. One day, in light wind and with an under-sized kite, the only way I could keep the lines tight and the kite in the air was to keep moving slightly upwind. Had I been more skilled at the time, I probably would have held my ground better by working the kite and keeping it moving to create its own apparent wind. It was one of the few times Ive had to make the walk of shame back to camp, but I had never expected that to happen from upwind.
In higher winds, working upwind is just as easy; its just a question of how much of a speed hit you want to take. We have just seen that our forward speed is limited by the wind window moving behind us as the apparent wind moves forward. By turning upwind, weve already put the apparent wind forward to start, so we will hit our speed limit sooner.
Look at figure 10 and consider two possible ways to work your way to a point upwind. The first approach keeps the kite farther off the wind. The buggy will go faster but will take more tacks and travel farther over the ground to get there. The second approach has the bug slogging into the wind at a slower pace but in a much more direct route. Which approach will get you there faster? To answer that, you need to know the velocity made good or VMG for a given point of sail. The VMG describes your progress towards your destination regardless of your direction or speed over the ground at any given moment. Your highest VMG will be at the most efficient tack angle for a given kite and wind speed.

Which will will make the best VMG (Velocity Made Good) towards the upwind destination? The course on the left is farther off the wind and will result in a higher ground speed but require more tacks. The course on the right is closer to the wind with a lower ground speed but is more direct.
If we knew the lift-to-drag ratio (L/D) of the kite, we could calculate the VMG with some trigonometry, but L/D data is not readily available for commercial kites and measuring it is a tedious task. The easiest way to measure VMG is with a GPS that has a VMG function built in. Set a destination point somewhere upwind, and then experiment to see which tack angles work best for you and your kite in various winds. A streamer or tell-tale tied to the top of your headstock tube (figure 13a) can help you measure and remember tacking angles by indicating apparent wind direction. When you get on a tack that seems to work best, remember the approximate angle of your tell-tail and try to duplicate it on future tacks.
The concept of VMG is applicable in downwind runs, too. As we have already seen, you cannot go directly downwind for more than a moment, but will have to work out a series of tacks in order to keep tension on the lines and the kite in the air.
Knowing precise VMGs for various kites and conditions is really only important if you are racing. On a more practical note, unless you have the good fortune of being able to buggy in open desert dry lakes, your tacking angles are going to more likely be determined by terrain, people and other obstacles. Its not uncommon for me to have a nice course worked out on a tack that just feels the best on our local beach, only to have a family walk up and plop down the blankets, chairs and towels right where I want to go. I then have to recalculate a combination of tacks to get around them while keeping them at a safe distance.
Rolling Into Buggy Camp
One good measure of basic proficiency with a kite buggy is to be able to consistently end up back at your starting place without the dreaded walk of shame (or walk of quiet reflection, as a friend calls it), with buggy in tow behind you. I find it very satisfying to pull in for a pit stop or to end a session and step out of the bug with it sitting in pretty much the same tire tracks as where I started, no matter whether the wind is light or strong.
When pulling into camp I like to maneuver into position so that I can roll in for a stop on a short straight downwind tack. Its one thing to get into the bug from the side when it is pointing across and slightly down-wind, since you have your body weight to help you sit down smartly into the seat, but standing up with the wind to your side can put you immediately off balance. Pulling to a stop with the wind at your back makes an exit from the buggy easier and safer.
Figure 11 shows an approach to camp from a couple of different tacks. When you reach a point upwind of your target spot, turn downwind and execute a jibe, setting yourself up for a few S-turns into camp. If you are starting on a fast tack, make the first turn a hard one and scrub off some speed with a skid. As you head downwind, size your turns to keep your lines tight and your speed low. In light winds youll make broad tacks and tight turns. In higher winds, youll need only short tacks and broader turns (the dotted line). The size of the kite will have an impact on your turn size too, and you will soon discover what turns will comfortably keep you slowing to a walking pace.

Pulling into camp downwind from two different tacks. In light winds, make broader tacks and tight turns. In higher winds, make shorter tacks and broad turns (dotted line).
As you near the spot and have slowed down enough, its easy to plant your feet, stand up and step forward over the pegs in one fluid motion to get you (and your shins) clear of the bug. In gentle winds, the straight downwind leg will start dropping the kite for your landing. In higher winds with the kite still overhead near the zenith, the kite will help you literally hop out and get clear of the buggy frame.
Accessing the Buggy and Pilot
When you go out for a buggy session, you’ll no doubt have your trusty kite bag, one or a few kites and the buggy, but there are a few other goodies that are nice to have along.
Wind Direction Indicator.
When flying statically, its pretty easy to keep track of the wind and keep it at your back, but when you’re driving around in the buggy, all you feel is the apparent wind, so its nice to have a wind direction indicator as a reference. As you can see in figure 12, it can be as simple as a pole stuck in the ground with a streamer on it, or as elaborate as a wind sock. Our little pole with streamer is made with PVC pipe sections and couplings that are glued on one half only, so it pops apart to fit in the kite bag. The big wind sock is more of a chore to carry and set up, but it can be seen from a mile down the beach.

A nice big wind sock is easy to spot from a distance.

A pole with a bright coloured streamer makes a simple wind direction indicator. This pole is made with three sections of PVC tubing that come apart to fit in the kite bag.
Apparent Wind Indicator
As mentioned earlier, an apparent wind indicator is handy to have in the buggy. Ours is made of a piece of bright coloured yarn flying from a small mast strapped with tie-wraps to the buggys headstock. Make the mast tall enough so that the yarn will not get caught in any part of the buggy when at rest, or it will surely snag on something during a jibe and become useless. Make the mast out of plastic tubing stiff enough to stay erect in a breeze, but soft enough that it wont hurt you if you fall on it or get dragged across it on an OBE. See figure 13a.
Speedometer
A speedometer is handy to have in the buggy both to monitor your performance on various points of sail as well as to brag to your friends about how fast you were going.
Modern hand-held GPS units starting at just over £70.00 and up will indicate and record speed over ground as well as maximum and average speed. Some models will have VMG (velocity made good, discussed earlier) functions as well. A compass bearing indicator is not necessary, but could be useful to calculate effective tacking angles, if you are curious.
A more affordable speedometer can be found at the local bike shop starting at about $20-25. They are made for bicycles, of course, but many can be re-calibrated for the smaller buggy wheels. You have to accurately measure the circumference of the wheel and follow the instructions. They work with a sensor on the front wheel fork and a magnet that is designed to be attached to a bicycle wheel spoke, so you will have to adapt. I used a small L shaped cup-hook with threads designed to screw into wood. Instead, I drilled a hole into the plastic wheel rim (away from the tube!) and screwed the hook into it, using the right-angle hook end to mount the magnet. I mounted the magnetic sensor onto the front wheel fork the way you would on a bike and screwed the cup hook in and out to get the right clearance with the sensor.

Bike speedometer strapped to down-tube with tie-wraps. Also note apparent wind indicator; Bright coloured yarn streams from a 6″ tall semi-rigid plastic tube strapped to the headstock tube.

Detail of magnet mounted to side of wheel rim. Sensor and wire are strapped to the inside of the wheel fork and the magnet is adjusted to pass the sensor within 2-3 mm.
Honestly, unless you absolutely can’t afford a GPS, the bike speedometer is something of a false savings in the long run and is not the best recommendation. With their components mounted so close to the ground, they get beat up quickly and will have to be replaced sooner than later. Modern GPS’s are more accurate, more rugged and more reliable. A photo of the GPS “Max speed” display following a run is becoming the standard means of documenting personal best and record speeds.
GPS Mount
I mounted my GPS to the bug with a handlebar mount available from Garmin, the GPS manufacturer. Of course the buggy does not have handlebars, so I made a bracket to support a round post to which the mount can be affixed. See Figure 14. The bracket is simply two pieces of 25mm x 3mm aluminium stock, one of which is bent as shown to match the down-tube width. The post is 12mm (inside diameter) PVC with a scrap of 12mm hardwood dowel epoxied inside. The aluminium pieces are held together at the top by a stainless wood screw that is countersunk and screwed into the wood-cored post, and at the bottom by two stainless screws joined underneath by a 25mm long hex nut meant as a connector for threaded rods. I gave the nut a shot of spray varnish I had lying around to slow down the inevitable corrosion. The aluminium can be bent by hand using a bench vice or clamped between wood scraps. Mount the GPS with the handlebar clip and adjust to the best viewing angle.
Some GPS mounts can be screwed on to the flat top of the down-tube, but this bracket, while a bit more work, lets me avoid drilling holes in the bug and makes it easy to move to my other buggy.
A piece of vinyl tubing tie-wrapped to the front fork makes a safe, secure and convenient place to keep your stake
Maintenance
When you add a kite buggy to your gear, you’ll want to add the following items to your kite bag
* Teflon spray lubricant from the bike or motorcycle shop
* Light bristle brush for cleaning
* The wrenches that came with the buggy
* Tire pressure gauge
* Tire pump
* Bungee cords
* Light rope or cord to use as a tow leash, looped around the foot pegs.
The Teflon spray is the same stuff they use on bike chains and similar machinery. It is used as a lubricant but it also makes a good moisture and corrosion barrier. Give a shot to the outsides of your bearings (at the centre of the wheel rims under the bolt heads and next to the axle) at the end of a session, especially if you have ridden through surf or puddles. In that case, it’s a good idea to rinse with fresh water from a hose and let it dry first. You will also want to give a regular shot to the headstock bearing so the front fork doesn’t squeak or bind.
The bristle brush is handy for cleaning caked-on sand or dirt from the tires, frame and under-side, especially if you are about to toss the dismantled bug into the back of the car.
If you are going to take the bug apart for transport, you will need the wrenches. More important however is being able to check the axle bolts for tightness and snugging them down hard. Check these at the start of every buggy session. This is especially true of the left tire, since the counter-clockwise rotation of the wheel tends to work the bolt loose. If the bolt backs out far enough, the wheel bearing pops out of the wheel and the bolt grinds the bearing socket, quickly destroying the wheel rim. We sell a good number of wheel rims for this reason. This will sometimes bend the axle bolt, so we stock those, too.
The tire gauge and pump are for obvious reasons. You should not have to re-inflate your tires often, but you may want to experiment to see what pressure works best for you. A lot of buggy tires are marked for a maximum pressure of 30 psi, but many riders use something less. For example, on hard-pack beach sand like you find at low tide, some tires grip better at a pressure of 20 psi. Lower pressure will also give you a softer ride, but arguably at the cost of some speed. Remember too that black tires will heat up in the summer sun and drive the pressure up, so allow for that as well. There is nothing like the bang of an exploding wheel rim to really get your attention.
If you are running tubeless tires, and many come that way, you will want to get a 12v electric compressor that will run off your car. When you go to change a tubeless tire, you need a constant rush of air to push the tire bead up on the rim to establish an air seal, and the intermittent huff and puff of hand pump may not cut it. Another problem with tubeless is that if they are ridden on the beach, fine sand can work its way into the rim and bead and disrupt the seal, causing slow leaks. A lot of riders move to tubes for this reason. In any event the electric compressors are not expensive, save a lot of time and effort, and are good to keep in the car as a safety item anyway.
The bungee cords are not really a maintenance item, but can be handy if you have to park your car a distance from your launch point. Use them to lash your kite bag and other gear into and onto the buggy and then use the leash rope to haul the whole kit out to the beach or field.
To clean your buggy, give it a good blast with a garden hose to get the sand and mud off the frame and seat. This is especially important if you have gunked it up at the beach with salt water. The seat can be scrubbed with non-bleaching detergent, if needed. After any cleaning, when the bug has dried completely, be sure to give a shot of teflon spray to the wheel hubs and front steering fork.
Buggy Safety and the Public
The same wide open spaces on a public beach or a park field that make great buggy spaces will of course attract crowds, forcing you to share the space. If there are no bans on power kite flying or buggies and land boards, consider yourself lucky and try to do everything possible to keep it that way by being safe and demonstrating to the public that you are looking out for them.
When I begin a buggy session, I start out slow and approach the boundaries of our space marked by sunbathers with great care. The buggy always attracts attention, especially with kids, so I make it clear by my head movements that I am looking out for people and pets. Often I will see a parent adopting a defensive posture in front of a child as I approach, but when they see me able to stop or change direction easily and far enough away from them (more than a kite-line length), they relax and either turn away or give a friendly wave.
When passing immediately down wind of other people, the buggy is no more imposing than a passing bicycle as long as speed is kept to a reasonable pace and enough space is left to react to any surprises. When I approach strolling people from behind I allow extra room in case they change direction suddenly and if they have kids and/or a dog with them, I double both my distance and vigilance.
One thing you should always avoid is passing up-wind of people closer than the reach of your kite lines. Depth perception is tricky, so always allow more room than you think you need. This is especially important when executing a jibe; if you botch the manoeuvre and end up with the kite behind you and powered up, an OBE is possible and you need room to kill the kite and let it fall without landing on someone. A deflated kite is of little risk to anyone, but the public will not necessarily know this and you do not want to generate complaints.
Occasionally I will see an open beach for a good distance and be able to blast along fully lit for a long ride, only to come back on the opposite tack and find myself boxed in by new picnic-goers or sunbathers that were not there on the first pass. Often I can work my way around them downwind by passing my kite over the dunes where the only danger of a crash is a possible tangle in the bushes rather than hitting somebody. Sometimes its just a matter of turning around for another run and coming back to see that someone has moved. If, however, I have to pass between people closer than I would normally like, I slow down and keep the kite very high up as close to the zenith as possible while still generating enough power to move slowly. As soon as I am clear, I then drop the kite down to power up and resume my run. Most people, when they see you pass slowly and then accelerate away, will figure out that you were being cautious and will appreciate your efforts.
Something else that might happen is, when you drop or crash the kite, or even set it down on purpose, a well meaning bystander may approach the kite, thinking you need assistance. Be sure to politely wave them off, since they wont appreciate the power of even a parked kite if it powers up in their hands. I always carry a ground stake in the buggy as indicated above so I can stake the handles and tend to the kite myself.
If someone does approach you when you are stationary but with the kite up, always keep the kite parked at the zenith, and ask the person to stand to your upwind side.
Another handy item for the kite bag is a set of little bright orange plastic cones available in sporting goods stores and meant for marking out race-courses and playing fields. I use four to six of them for marking out my kite lines when the kite is parked and staked to the ground. It helps to keep passers-by from tripping over your lines and keeps maintenance and patrol vehicles from running over them.

Some of the best buggying during the Summer months is when low tide occurs after 5:00 or 6:00 pm. The sunbathers are gone, only a few picnic groups remain and joggers or other pedestrians are usually either at the surf-line or up by the dunes. If the afternoon sea-breeze is still on, it is just a matter of parking the kite off your shoulder, sitting back and enjoying a ride down several miles of open beach.
Moving On
At this point we could discuss some tricks, but we mean only to cover the basics here. You will probably learn some of tricks on your own by accident. The first time you do a fast jibe and end up spinning out in a full 180, its not much of a stretch to try it again and just not turn the kite; instant backwards buggying! Same thing when the kite powers up in a gust and you find yourself on two wheels for a moment; you’ll likely try to replicate it sooner or later and see how long you can balance with your upwind rear wheel in the air.
One thing you have probably learned by now is that your kite bag will likely grow with various kites to suit a variety of conditions. Once you are cruising comfortably, you may wish to consider investing in a de-power kite. Unlike fixed bridle kites that fly just as well statically or on the move, de-power kites are really in their element when in motion in a buggy, on a land board or on skis. De-power kites differ from fixed-bridle kites in that instead of using the rear lines as brakes by deflecting the trailing edge of the kite, they work with a moveable bridle to change the angle-of-attack of the entire kite. The rear lines are connected to the ends of the bar, and the front lines are connected to a centre line that runs through the middle of the bar to a harness hook. Moving the bar in or out either powers up the kite as the angle of attack increases, or de-powers the kite as the angle of attack decreases, effectively putting the kite in neutral.
De-power kites tend to be much more expensive (and they require the purchase of a harness), but because of their ability to throttle up and down, they have a very high usable wind range, allowing them to potentially replace two or three fixed bridle kites in your bag. Because their power can be adjusted almost instantly, they are also great for absorbing gusts. Flying on a bar with a harness gives you the added benefit of flying with one hand free to reach for a water bottle or wave to the people you pass as they point with mouths agape. To learn more about de-power kites, look for our next article, Flying on De-power.
The material we have covered here should help you get started and keep you out of trouble for a good while. The more you practice, the more comfortable you will be in a wider variety of conditions. As your skills improve and your confidence grows, speeds that at first terrified you will become comfortable and routine allowing you to push your upper limits farther. Enjoy the ride and remember, when you are in a buggy, life is definitely better when it blows!
https://popeyethewelder.com/a-kite-buggy-tutorial-lets-start-at-the-beginning